Original Link: https://www.anandtech.com/show/2561
Silverstone Zeus 1200W: Designed for the Power Hungry
by Christoph Katzer on July 7, 2008 2:00 AM EST- Posted in
- Cases/Cooling/PSUs
Introduction
We recently tested the latest Silverstone Decathlon series power supply, but we also wanted to review one of their top-end models from the Zeus series. Silverstone has delivered many new features in the past, and their build quality has always been good. Unfortunately, the major addition for the Zeus family appears to be the bump to 1200W - power very few people will ever need for their system. However, the Zeus 1200W does make some changes to the voltage delivery subsystem that may be useful.
Silverstone is an established name in the market for their cases as well as their power supplies. The latest Decathlon had a superb acoustic noise level as we saw in our recent review. Before that we saw other Decathlon and Olympia models that performed decently. Silverstone also announced a new passively cooled power supply just a few weeks ago that we will test in the near future.
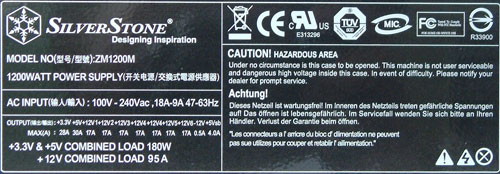
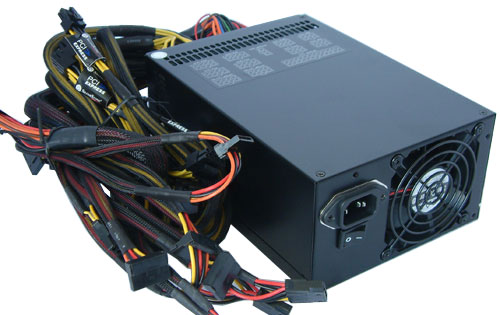
The label shows six 12V rails with an enormous combined power of 95A. However, each rail is rated at 17A, which is not too much as we will find out later during the tests. If you prefer, the 12V rails can be combined into one massive 12V rail that will deliver the 95A alone. On the side is a little white round sticker that hides a switch used for combining the rails, but we do not recommend peeling off this sticker since you still won't be able to reach the switch. To access the switch, you will need to open the PSU casing as we will see later (Update: This problem seems to be only with the first models like the one we have tested. The units in the shops have already access to the switch from outside). The 3.3V rates 28A and the 5V rail 30A, both of which are more than sufficient. The standby rail rates 4A, which is according to the latest EPS12V norm.
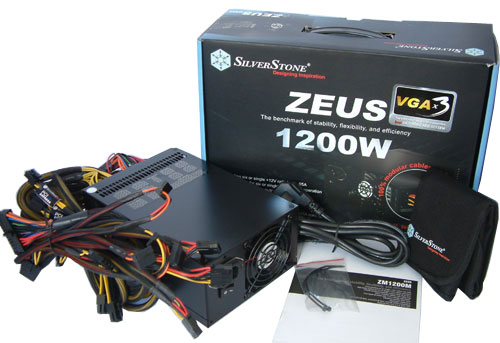
Package and Appearance
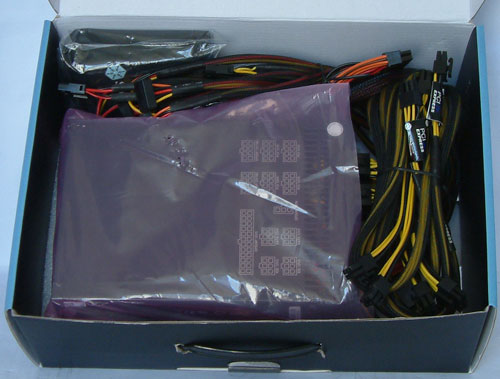


The package is typical Silverstone. All the important features are clearly visible on the black and blue box. The power supply lies between two sheets of plastic foam with the many cables tucked around it. Also in the box are screws, a manual, cables ties, a power cord, and a bag in which unused cables can be stored.
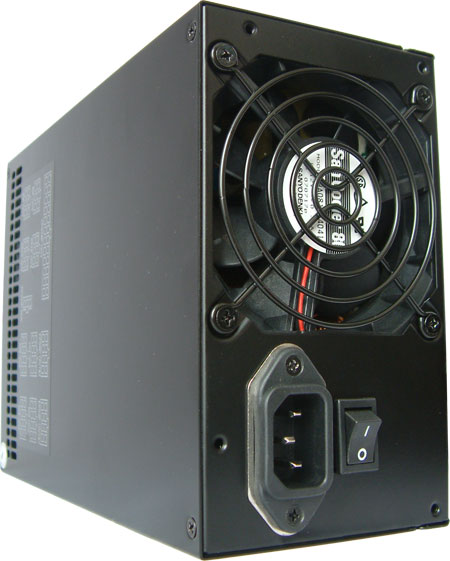
Two features of this power supply normally don't fit well with a 1200W design. One is the 80mm fan and the second one is the cable management system. Normally an 80mm fan needs plenty of ventilation at the front so that air will properly flow through the internals and provide adequate cooling. Those openings make it difficult to place the connectors for cable management. The Antec Truepower Quattro that we reviewed last year provided a good solution. Half of the front section was covered with the jacks of the cable management and the other half was perforated to let air inside of the housing.
Silverstone made things a little more difficult since they wanted all of the cables to be removable; that results in more jacks and therefore requires more space. They accomplished their goal by placing two rows of holes all around the housing to work as air intakes. The cable management is at the front and doesn't affect the airflow, and Silverstone manages to stick with a 80mm fan. The power supply comes in the usual black color as we see from Silverstone.


Cables and Connectors
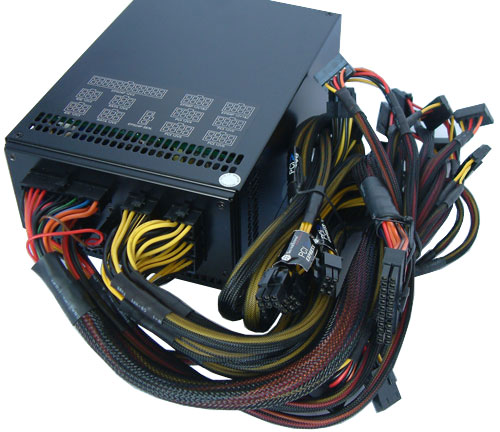
All of the cable harnesses are removable, which is a nice feature Silverstone tries to implement in many of their power supplies. The advantage is that the user can buy alternative shorter cable harnesses if the user wants to put the power supply in a smaller chassis. One concern with cable management is the added resistance the connectors create, which is of special concern with 1200W designs. It seems that Silverstone still meets all the official safety requirements though, so we'll leave it at that and let the testing answer any questions about the overall design.
All of the harnesses have sleeves and the four PEG harnesses carry a PCI-Express marking. Silverstone doesn't include too many peripheral connectors, since we have only six each of Molex and SATA. Instead, they put a great focus on the graphics card connectors. There are two 55cm harnesses with a 6/8-pin PEG connector and an additional 6-pin PEG connector 20cm from the first. There are two additional cable harnesses with one 6-pin PEG connector, making it possible to run a decent triple-SLI setup. The two 8-pin EPS12V connectors for the motherboard are another nice feature, and the one can be transformed into a 4-pin ATX12V connector. This makes it easy to use this power supply whether there are two 8-pin jacks on the motherboard or in normal PC systems that only have one 4-pin ATX12V connector.

The Fan
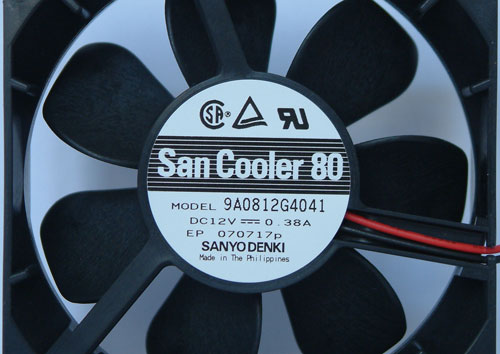
We have seen this 80mm Sanyo Denki fan a few times already. It can spin at up to 4500RPM and is rated as creating 40dB(A) of noise; fortunately, we didn't measure levels that high during our tests, though it's not that far off.
The Inside
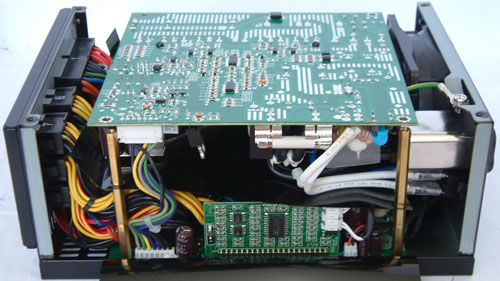
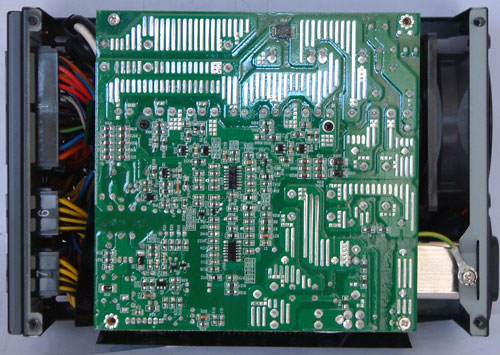
The housing is easy to open and with the top plate removed we can see the back of a PCB. Now it's clear why Silverstone needed to stick to an 80mm fan because the sandwiched PCB design doesn't allow the use of a larger fan. Sandwiched PCBs (i.e. two PCBs with all the components on the inside) are becoming a more and more common design these days; the Antec Signature Series we just tested also used this approach. In general, one can say that the designers leave the filtering stage and the primary stage with mostly AC-voltage on one PCB and the second one carries the secondary stage with DC voltage only. Due to a lack of space, the standby rail also usually resides on the first PCB.
Let's return to a problem we mentioned earlier regarding multiple vs. single 12V rails. After a user has scratched away the white sticker on the side of the power supply he will recognize that his warranty is gone and it didn't even help further since the manufacturer placed a plastic sheet behind the sticker, making it impossible to reach the little switch. You need to open the power supply to use this switch, which is quite unfortunate. During testing we had several problems with the 17A on the 12V rails, which led us to the point that we combined all of the 12V rails into one and our load problem was gone. The problem is that Silverstone doesn't mark the 12V wires on each harness to differentiate the 12V rails, so the user/reviewer is unable to see immediately which 12V rail is being connected to the what components (or in our case, the programmable load). Most end-users will not need to worry about this problem, as 17A per 12V rail should be sufficient. You may need to juggle a few connections if you somehow manage to create a 1000W or higher load, but the multiple PEG connections already address that to a large degree.
First PCB
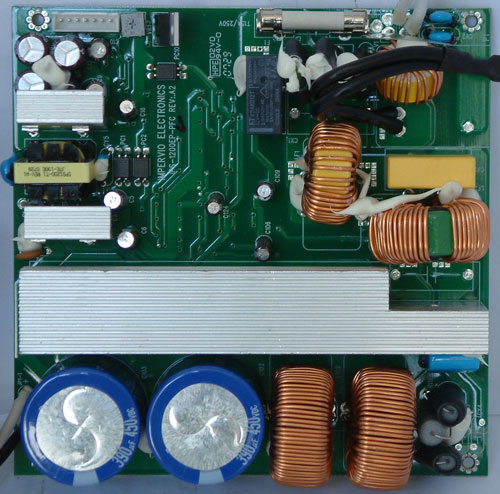
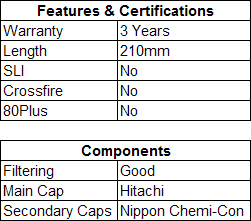
The first PCB in this PSU carries the filtering stage, the primary stage, and the standby circuit. The filtering stage is easy recognizable through its fuse on the top, several caps, and coils. The rectifier bridge is hiding under the heatsink on the right side. There are two large coils and two main-caps, as the designers couldn't place one single large cap due to the reduced possible height. The two caps are identical and come from Hitachi, both rated at 390µF and 450V, which is well within feasibility. The upper left side features the standby circuit with its own small transformer. Besides the circuitry we see the name Impervio printed on the PCB, which is a familiar name with Silverstone power supplies. Even though this power supply still seems to be produced by IS Quasar; the designer is Impervio in cooperation with Silverstone.
Secondary PCB
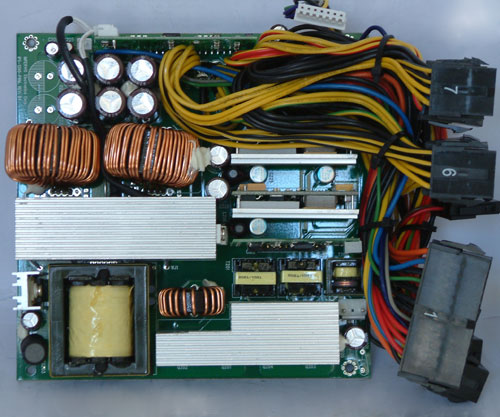
The second PCB is much more packed than the first one, carrying more components. First, we have the transformer that is responsible for the 12V rail. Then we see a couple of heatsinks, smaller transformers, coils, and Nippon Chemi-Con caps in the top. We also see another feature not many power supplies have used until now. The 3.3 and 5V rail are generated by VRMs, which can be found on the middle right side of the PCB. This may cause you to think the time has come where we won't need any of the additional rails anymore. Since modern motherboards also use VRMs to convert the voltage into whatever is needed by the components, it seems like a good time to switch to 12VDC only. A few problems remain with peripheral components like SATA drives or optical drives that still sometimes use a voltage other than 12V, but these don't need much of the other voltages.


Testing with the Chroma ATE Programmable Load
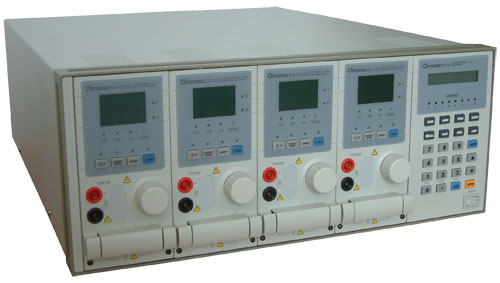
Our test equipment consists of two Chroma programmable DC Loads that enable us to test power supplies with an output of up to 1500W. The biggest advantage of the Chroma DC Loads is simply the high precision it provides. It can measure differences as small as 0.001V and 0.0001A, which will provide us with best-in-class results.
When programming the Chroma with specific amounts of load calculated according to the ATX norm, we are able to load power supplies to an exact percentage. We can now show results at every specific percentage needed. To get the best overview of a power supply, we load each unit with 10%, 20%, 50%, 80%, 100%, and 110% of the specified output. This is easy to calculate for a 1000W power supply: the 10% load is 100W and 110% load is 1100W. Remember that this is the amount of power the PSU delivers; due to inefficiencies, a power supply will actually draw more power from the wall.
Note: If you would like to know more about our testing methodology, equipment, and environment, please read our PSU testing overview.
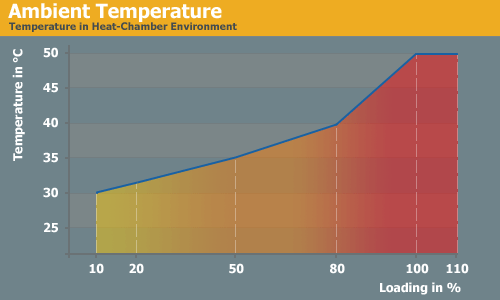
We have added an additional 10% on the highest load to see how the units perform with overload. This test will be performed in all future reviews. The overload test is performed at room temperature as well as under more stressful conditions; to ensure we are not too cruel to the power supplies, we will keep the ambient temperature at 50°C in the stress test. Experience shows that many units can stand the overload at room temperature but will experience problems with higher temperature and overload together. Only the best-built units will survive this.
The Testing Environment
There is one flaw in testing power supplies with programmable loads while trying to measure the sound pressure levels at the same time. Because the programmable loads get very loud, there is no chance of hearing the power supply on the test stand. In order to make accurate measurements of the noise levels we needed a way to separate the test unit and the programmable loads. Our solution was to build a very thick box around the unit.
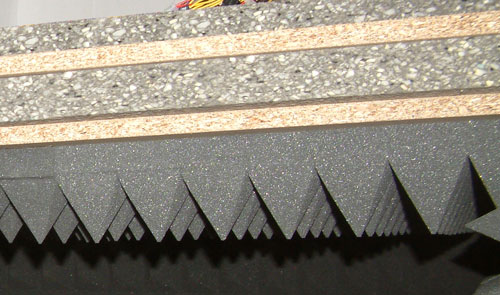
We concluded that a five-layer box with a total thickness of 6" (15cm) containing two layers of wood and three layers of special foam would suffice. It is designed as a box within a box. The inner box does not touch any part of the outer box, making it difficult for acoustic noise to pass through in the form of vibration. Each box is isolated on both sides with a layer of heavy foam that is normally used to insulate engines. On the inside we have an additional layer of 4" (10cm) thick pyramidal foam on every side of the box to eliminate the acoustic waves coming from the test object as well as we can.
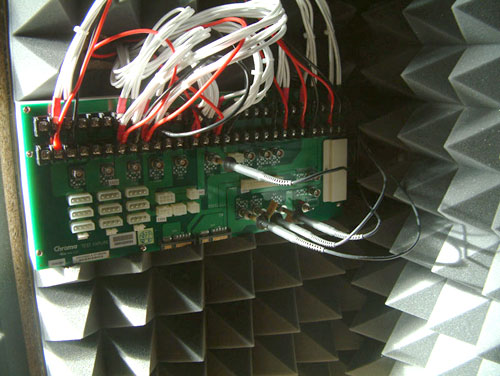
To ensure a completely closed system we installed the printed circuit board that the connectors of the power supply are attached to inside the anechoic room/box. In other box designs, you would need to put all the cables through the wall. Unfortunately, that would result in the inside of the box not being fully isolated anymore. Our design keeps everything that needs to be connected inside of the box and maintains isolation.
DC Outputs and Quality
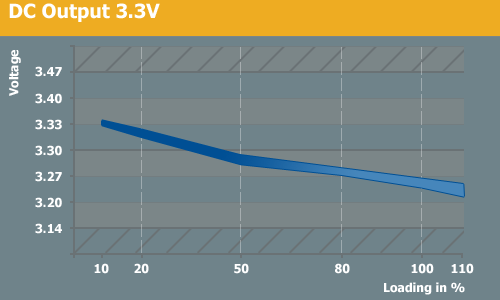
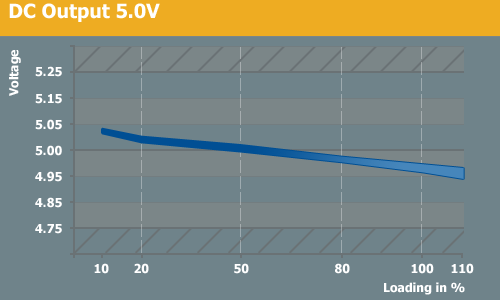
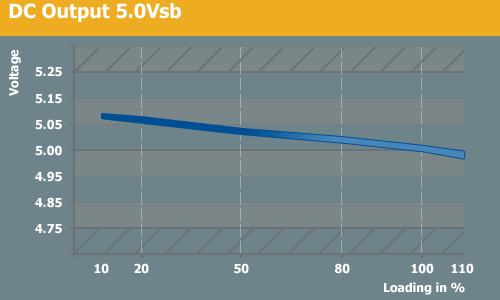
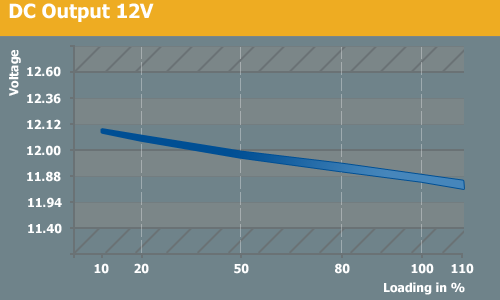
The general voltage drops were between 1.5% and 2.5%, which is a fairly good result considering the vast amount of power this PSU delivers. We see of course the usual drop but all rails start at least 1% above the nominal rate. The important 12V rail drops down to 11.88V while loaded with 1200W of power, which is a good result under these circumstances. The quality of each rail is also surprisingly good. Ripple on the lower voltage rails doesn't reach higher than 4mV, and the 12V rails don't reach more than 12mV even with full load. At lower loads, the 12V rails are also around 4 to 8mV which is a very good result.
Efficiency and PFC
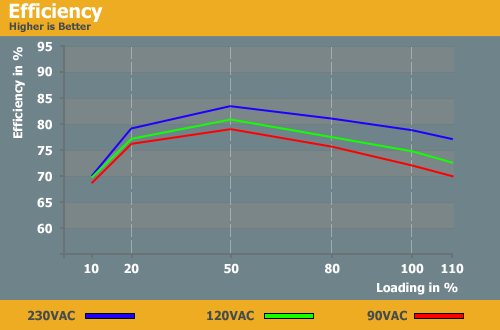
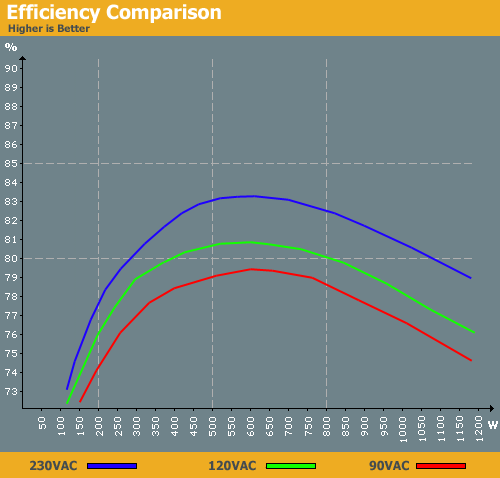
Looking at the efficiency the first time, we actually couldn't believe the results and ran all our tests again. Unfortunately, the testing is correct and the efficiency is as you see above. Particularly at lower loads, the Zeus 1200W isn't that great, but that's not a huge concern as most buyers likely don't intend to use it with less than 300W of power. This power supply was made for maximum power setups and we don't expect stellar results at lower loads. Anyone even considering this power supply should plan on a minimum of 300W power draw - perhaps on servers or workstations that are rarely idle. As the graph shows, the best efficiency is reached with a power draw of 500W to 600W. If the goal is to stay in the 80% or higher efficiency range, 230VAC users will get this with power draws ranging from around 300W up to 1100W; 120VAC efficiency is quite a bit lower and only reaches 80% or higher in the 400W to 800W range, and 90VAC doesn't even break into the 80%+ efficiency range.
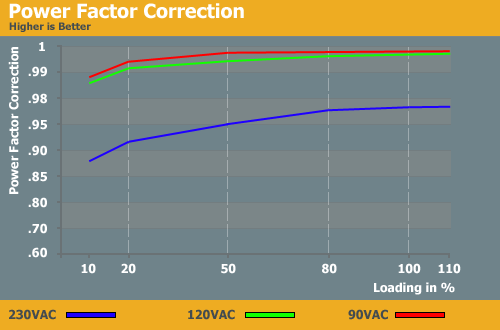
The power factor correction does very well, especially with lower input voltages. We haven't seen such a good result for a long time. 230CAV users will need to be happy with average results of up to .975.
Fan Speed and Acoustics
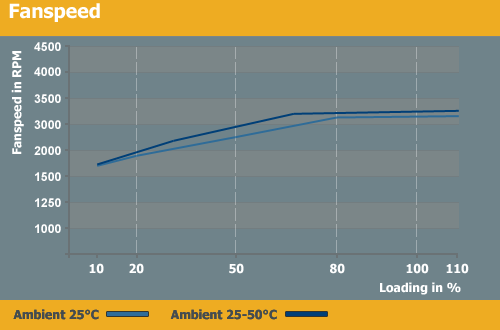
As you can see, the fan immediately starts turning faster with each increase in load. The starting point of 1700RPM isn't particularly high, but it's quite a bit faster than what we see on the 120mm and 140mm designs. The highest rotation is reached at little more than 60% of load; while this is definitely healthy for the product (it will keep temperatures in check), it's a bit sad for the user since the PSU will generate more noise.
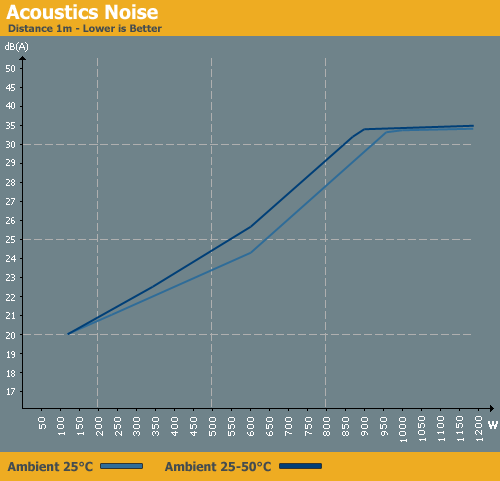
The noise levels increase steadily with the slightest increase in RPMs. The starting point of 20dB(A) is nice, but with increased loads it climbs quickly into more irritating levels and comes to an end at a noisy mark of 35dB(A). The results are disappoint when we compare the Zeus with the Decathlon 700W that delivered tremendous results even at high power output; in comparison the Zeus only needs a moderate SLI graphics setup (400W power draw) to surpass the maximum noise levels of its "little brother". Of course, short of extreme overclocking it is virtually impossible to come anywhere near the maximum 1200W power output of the Zeus; anyone with a need for that much power likely has little concern for a bit more noise anyway.
Conclusion
Talking to Silverstone reps always brings the same message about the company philosophy. They have no need for the mass market; Silverstone tries to make their mark with special products. Given that philosophy, it's no shock that the prices are higher than the competition, but there are clearly users that buy these products since the company continues to exist. Silverstone demonstrates with the Zeus 1200W that they are able to produce products with a few interesting features. The quality is good as always, and we saw a very well built PCB layout that was actually fun to take apart.
The length of 210mm (roughly 8 inches) means the power supply won't fit in many smaller cases, and users will need to pay attention to spacing as many cases have either hard drives or optical drives that can get in the way. Cases with a separate thermal area for the PSU (i.e. the popular Antec P182, some Lian Li offerings, and similar units) will have trouble mounting this unit. It's important to note that besides the casing length, the cable connectors at the front add another inch to the total required length.
 |
From the connector side we have few complaints. There are connectors for all kinds of graphics card arrays and in our opinion plenty of connectors for a large number of peripheral components. Six Molex and SATA connectors are available, so you will have to determine if that's enough for users with large disk arrays like on a server farms; for gamers, though, it should definitely be enough. The length of the cables is also good since we have a distance of 55cm to the power supply from ATX and PEG connectors. A nice feature to fight cable clutter is the two PEG connectors on one cable harness. This allows users with three graphics cards to run three harnesses instead of six through the case. One of the highest power consuming graphics cards, the NVIDIA 8800 Ultra, needs up to 160W, so it will pull a around 3A on each of the pins within the connector (with some power coming from the PEG slot on the motherboard).
Performance-wise, we saw some flaws today that are severe from the view of an enthusiast but not from someone who builds servers or workstations. The DC output is well regulated, with up to 2.5% around the nominal number of each rail. To archive this with a load up to 1320W is something many competitors can only dream of accomplishing. The output quality comes from the well designed PCB and the choice of components. Silverstone unfortunately had to make choices that hurt efficiency somewhat, so the Zeus only manages 84% with 230VAC. Up to 84% efficiency is nothing to be ashamed of, but in comparison to other high output PSUs we have seen better. For users wanting to save a few dollars more on electricity, we would recommend other power supplies. The acoustic noise is also poor in comparison to some other solutions. It is very good for a power supply to stay cool, but it should have been possible to reduce noise somewhat without temperatures getting too high. The fan rotates faster with every small increase in load, and it reaches its top speed of 3200RPM at only a 60% load. The noise certainly won't be a problem in a datacenter, but it does limit the appeal for the product.
Our only serious concerns relate to the acoustics and the length of this power supply; in terms of providing a stable output with huge amounts of power, the Zeus 1200W is top notch. As for the price, the Zeus 1200W is available in for around $350 to $400 in the US. We haven't actually seen availability in the European market yet, and that may not occur unless Silverstone is willing to bring this unit to the masses. The price is quite high, but then we really didn't expect a unit targeting the elite users to rate anywhere near affordable. If you have a need for 1200W of power, the Zeus may fit the bill; the rest of us with mere mortal budgets and PCs will have to be content with something else.


